
Your Cart is Empty

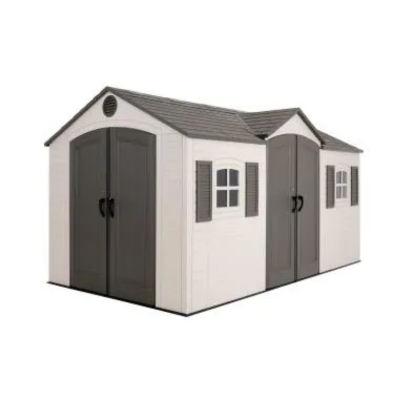
I know how some of you feel when it comes to assemble furniture or even bitter items sheds. While the specifics of the assembly process can vary slightly depending on the exact model, Lifetime sheds comes with easy to understand instructions. I will provide a general guide on how to assemble a 15 x 8 Lifetime shed.
Here are the general steps you would follow:
Prepare the area
First, you'll need to choose a level spot to place your shed. The surface should be firm and even. You might use a ideally a concrete slab or wood platform, but if you have none gravel be fine.
Unpack the shed
Unpack your 15 x 8 Lifetime shed shed from its boxes and lay out all parts. This will make it easier to locate the parts you need during assembly. Read through the instructions manual to understand the process, tools required, and the parts involved. Take your time don't rush thing, it shouldn't be hard instructions are very straight forward.
Assemble the trusses
Follow the next steps in instruction to put together the roof trusses. You'll typically need to attach support braces to them.
Assemble the walls
Begin with the back wall and the doors. Attach these to the floor according to the instructions. Then proceed to assemble the side walls. Make sure all the panels click into place and are securely attached.
Install the trusses
Once the walls are up, you can install the trusses. They will usually slot into specific points on the walls. Make sure they are correctly aligned and secure.
Attach the roof
You can then proceed to attach the roof panels to the trusses. Always start from the lower edge of the roof and work your way upwards. Make sure each panel interlocks correctly with the one below it.
Secure the roof
When all the panels are in place, you'll need to secure the roof. This usually involves inserting screws into designated points on the roof and tightening them.
Install the doors
Now it's time to install the doors. These should be hung according to the instructions provided, and ensure they are correctly aligned and open and close smoothly.
Attach trim and other accessories
Lastly, attach any trim pieces and accessories such as corner shelves or tool hangers, as per your shed's design.
Check for stability
Once everything is in place, double-check all screws are tightened and that the shed is stable. It's also worth running a bead of silicone caulk along the seams for extra weatherproofing.
It is always a good idea to have at least one other person to help you, especially when it comes to installing the walls and roof panels. Also, if you're in doubt at any point, don't hesitate to contact our customer service. We will be happy to help.
Kristina Walsh

Comments will be approved before showing up.